1. 环境准备 1.1. 基本信息 系统:CentOS Linux release 8.2.2004 (Core)
CPU :2核
内存 :4G
磁盘 :20G
Zabbix :5.4
1.2. 关闭防火墙 1 2 systemctl stop firewalld.service systemctl disable firewalld.service
1.3. 关闭SElinux 1 2 3 4 setenforce 0 vi /etc/selinux/config #把SELNUX=enforcing换成 SELINUX=disabled
2. 配置yum源
zabbix官方网站:https://www.zabbix.com
zabbix官方镜像网站:https://repo.zabbix.com
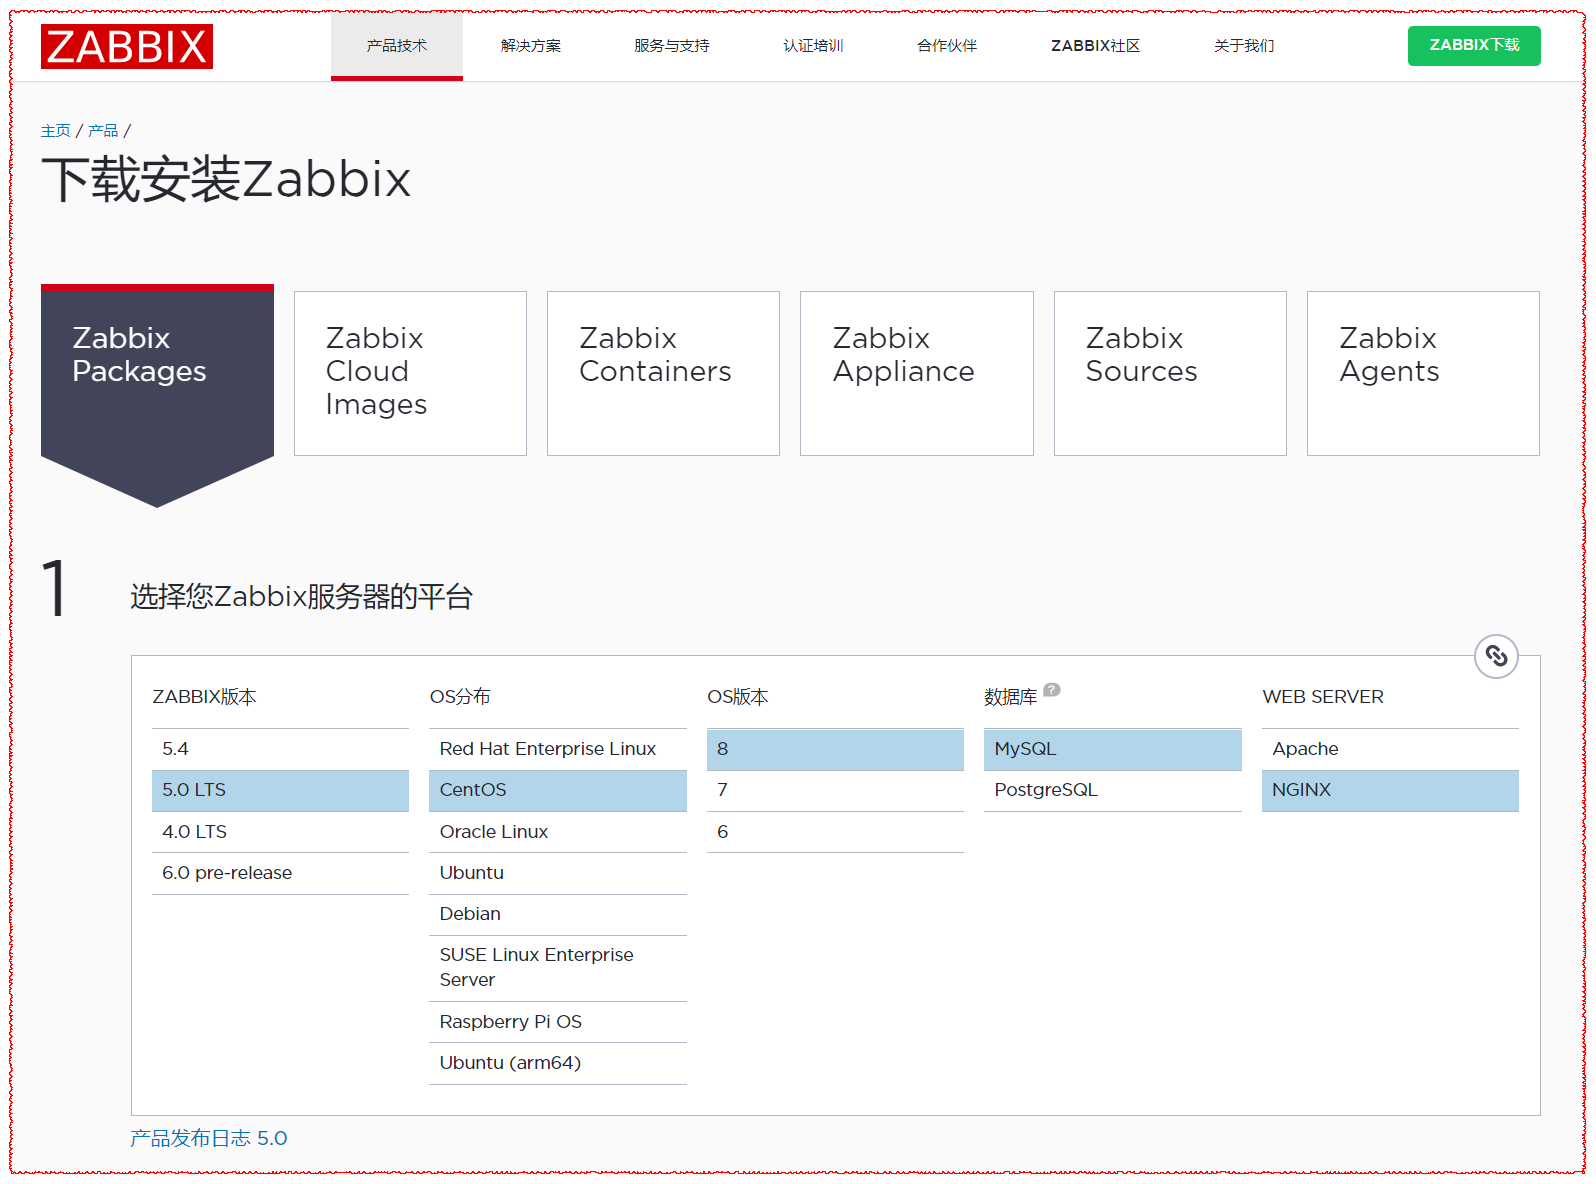
zabbix下载:https://www.zabbix.com/cn/download
选择需要安装的版本
选择好版本后下载:
1 2 3 4 5 wget https://repo.zabbix.com/zabbix/5.4/rhel/8/x86_64/zabbix-release-5.4-1.el8.noarch.rpm rpm -ivh zabbix-release-5.4-1.el8.noarch.rpm dnf clean all
3. 安装 安装Zabbix server,Web前端,agent
1 dnf install -y zabbix-server-mysql zabbix-web-mysql zabbix-nginx-conf zabbix-sql-scripts zabbix-agent
查看安装后的包
1 2 3 4 5 6 7 8 9 10 [root@zabbix ~]# rpm -qa|grep zabbix zabbix-web-deps-5.4.8-1.el8.noarch zabbix-agent-5.4.8-1.el8.x86_64 zabbix-web-5.4.8-1.el8.noarch zabbix-web-mysql-5.4.8-1.el8.noarch zabbix-nginx-conf-5.4.8-1.el8.noarch zabbix-sql-scripts-5.4.8-1.el8.noarch zabbix-server-mysql-5.4.8-1.el8.x86_64 zabbix-release-5.4-1.el8.noarch
安装配置数据库
1 2 3 4 5 6 7 8 9 10 11 12 13 14 15 16 17 18 19 20 21 # 安装 dnf install -y mysql-server mysql-devel mysql-libs # 启动 systemctl start mysqld #加入开机启动 systemctl enable mysqld.service # 初始化 mysql_secure_installation # mysql -uroot -p password mysql> create database zabbix character set utf8 collate utf8_bin; mysql> create user zabbix@localhost identified by 'password'; mysql> grant all privileges on zabbix.* to zabbix@localhost; mysql> quit; # 导入 zcat /usr/share/doc/zabbix-sql-scripts/mysql/create.sql.gz | mysql -uzabbix -p zabbix
为zabbix server配置数据库
1 2 3 4 # 连接数据库 vim /etc/zabbix/zabbix_server.conf DBPassword=password
为zabbix前端配置PHP,取消注释并设置“listen”和“server_name”
1 2 3 4 vim /etc/nginx/conf.d/zabbix.conf listen 80; server_name example.com;
nginx配置文件内容
/etc/nginx/conf.d/zabbix.conf
1 2 3 4 5 6 7 8 9 10 11 12 13 14 15 16 17 18 19 20 21 22 23 24 25 26 27 28 29 30 31 32 33 34 35 36 37 38 39 40 41 42 43 44 45 46 47 48 49 50 51 52 53 54 55 56 server { listen 80; server_name zabbix.example.com; root /usr/share/zabbix; index index.php; location = /favicon.ico { log_not_found off; } location / { try_files $uri $uri/ =404; } location /assets { access_log off; expires 10d; } location ~ /\.ht { deny all; } location ~ /(api\/|conf[^\.]|include|locale|vendor) { deny all; return 404; } location ~ [^/]\.php(/|$) { fastcgi_pass unix:/run/php-fpm/zabbix.sock; fastcgi_split_path_info ^(.+\.php)(/.+)$; fastcgi_index index.php; fastcgi_param DOCUMENT_ROOT /usr/share/zabbix; fastcgi_param SCRIPT_FILENAME /usr/share/zabbix$fastcgi_script_name; fastcgi_param PATH_TRANSLATED /usr/share/zabbix$fastcgi_script_name; include fastcgi_params; fastcgi_param QUERY_STRING $query_string; fastcgi_param REQUEST_METHOD $request_method; fastcgi_param CONTENT_TYPE $content_type; fastcgi_param CONTENT_LENGTH $content_length; fastcgi_intercept_errors on; fastcgi_ignore_client_abort off; fastcgi_connect_timeout 60; fastcgi_send_timeout 180; fastcgi_read_timeout 180; fastcgi_buffer_size 128k; fastcgi_buffers 4 256k; fastcgi_busy_buffers_size 256k; fastcgi_temp_file_write_size 256k; } }
4. 启动Zabbix server和agent进程 启动Zabbix server和agent进程,并为它们设置开机自启:
1 2 systemctl restart zabbix-server zabbix-agent nginx php-fpm systemctl enable zabbix-server zabbix-agent nginx php-fpm
卸载zabbix
1 2 3 4 5 6 7 8 9 10 11 12 13 14 15 16 17 18 19 20 21 22 23 24 25 26 # 停止 systemctl stop zabbix-server zabbix-agent nginx php-fpm # 查看安装的zabbix [root@zabbix ~]# rpm -qa|grep zabbix zabbix-web-deps-5.4.8-1.el8.noarch zabbix-agent-5.4.8-1.el8.x86_64 zabbix-web-5.4.8-1.el8.noarch zabbix-web-mysql-5.4.8-1.el8.noarch zabbix-nginx-conf-5.4.8-1.el8.noarch zabbix-sql-scripts-5.4.8-1.el8.noarch zabbix-server-mysql-5.4.8-1.el8.x86_64 zabbix-release-5.4-1.el8.noarch # 使用yum remove卸载 yum remove zabbix-web-deps-5.4.8-1.el8.noarch zabbix-agent-5.4.8-1.el8.x86_64 zabbix-web-5.4.8-1.el8.noarch zabbix-web-mysql-5.4.8-1.el8.noarch zabbix-nginx-conf-5.4.8-1.el8.noarch zabbix-sql-scripts-5.4.8-1.el8.noarch zabbix-server-mysql-5.4.8-1.el8.x86_64 zabbix-release-5.4-1.el8.noarch # 这里也可以使用rpm -e或者rpm -e --nodeps来卸载 # 普通删除 rpm -e zabbix-(根据实际包名删除) # 强力删除,如果上面命令删除不了 rpm -e --nodeps zabbix-(根据实际包名删除) # 查找zabbix目录删除 find / -name zabbix
配置前端
官方文档:https://www.zabbix.com/documentation/current/manual/installation/frontend
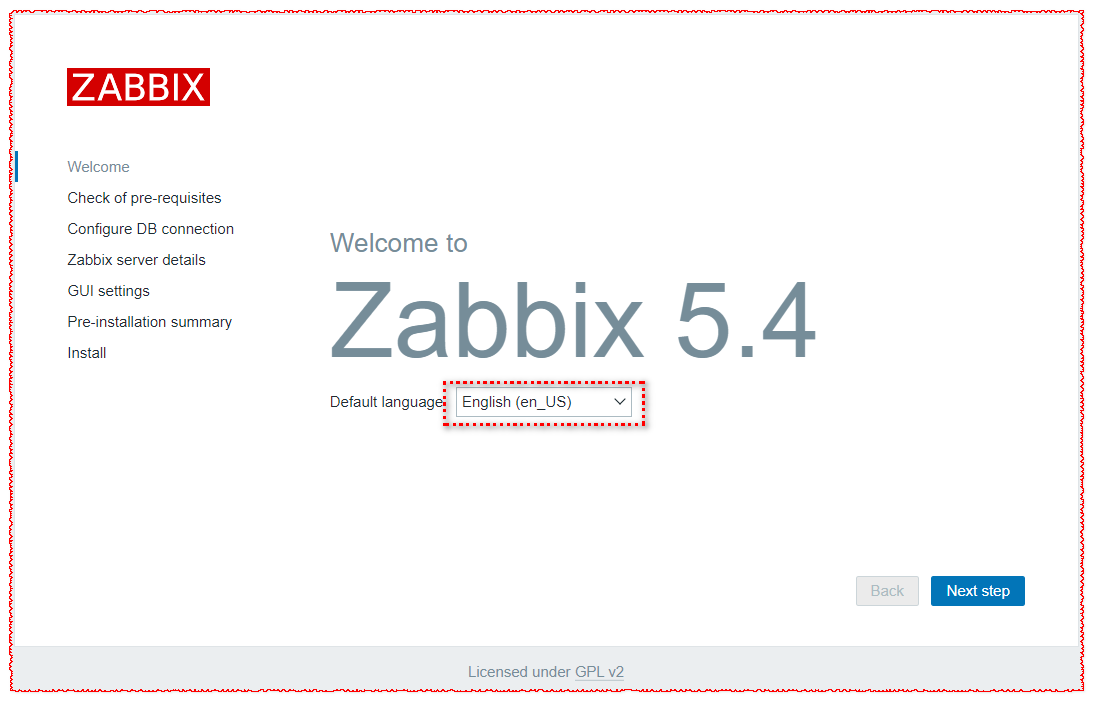
浏览器访问:http://ip/ 或者 http://域名/
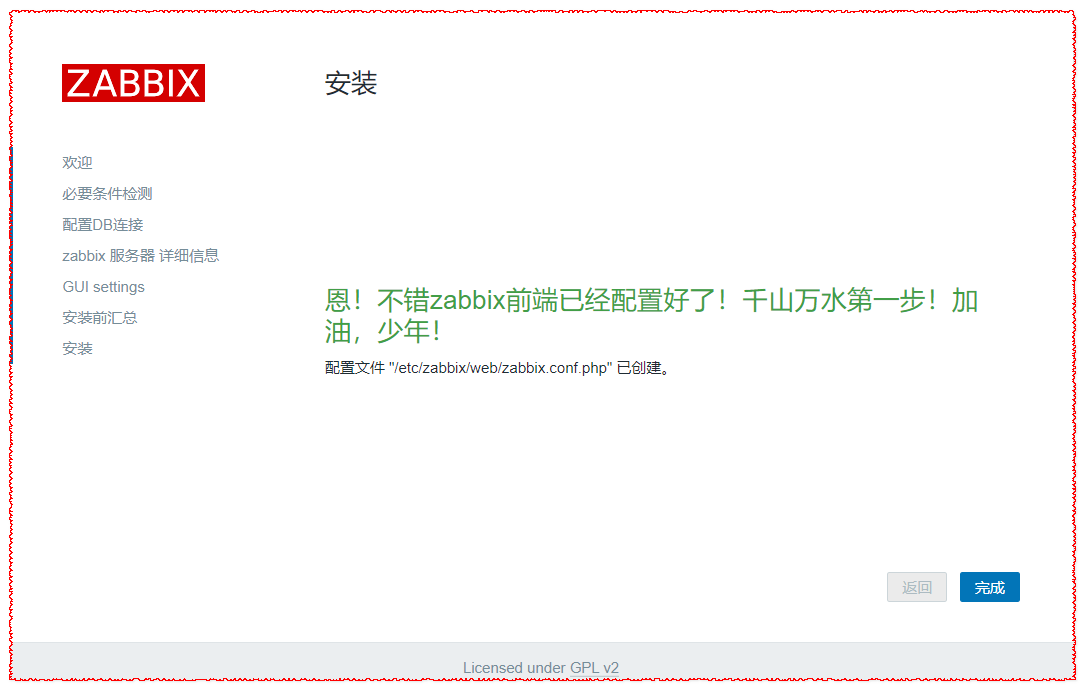
成功访问后可以看到如下页面,这里修改默认语言为中文
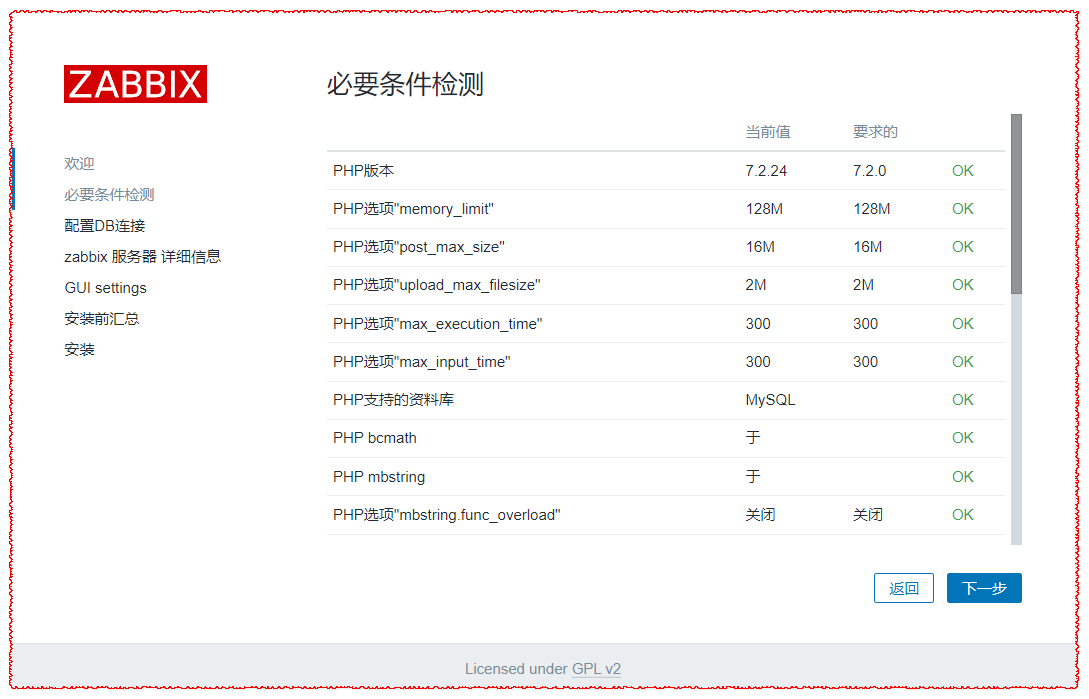
检查先决条件,确保满足所有软件先决条件:
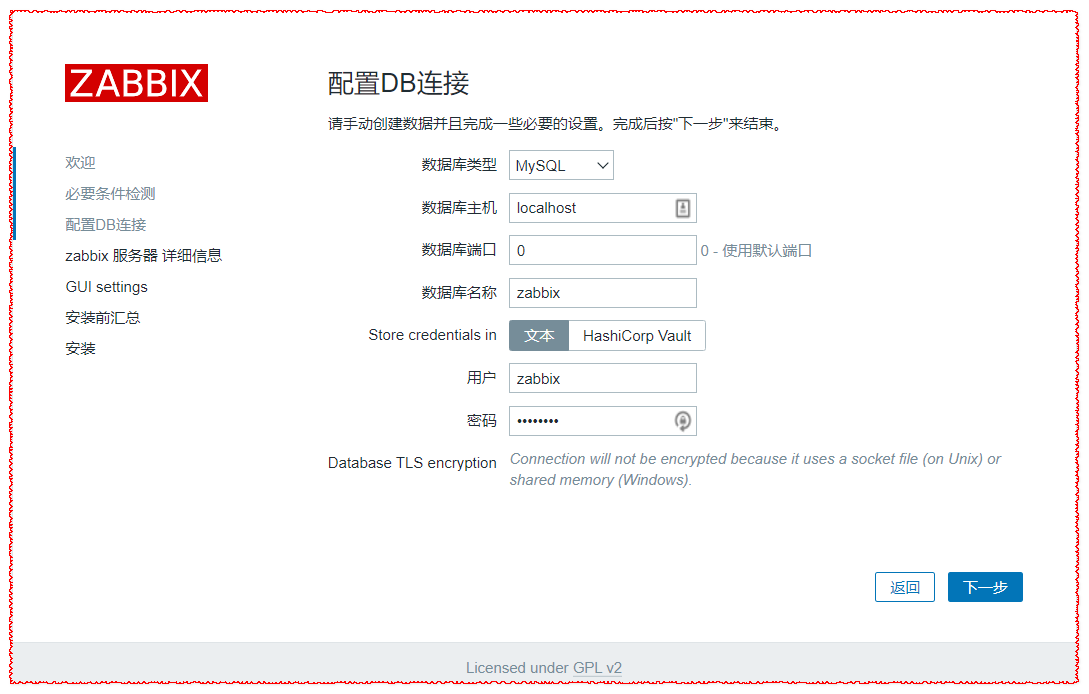
配置数据库连接:
输入zabbix服务器信息:
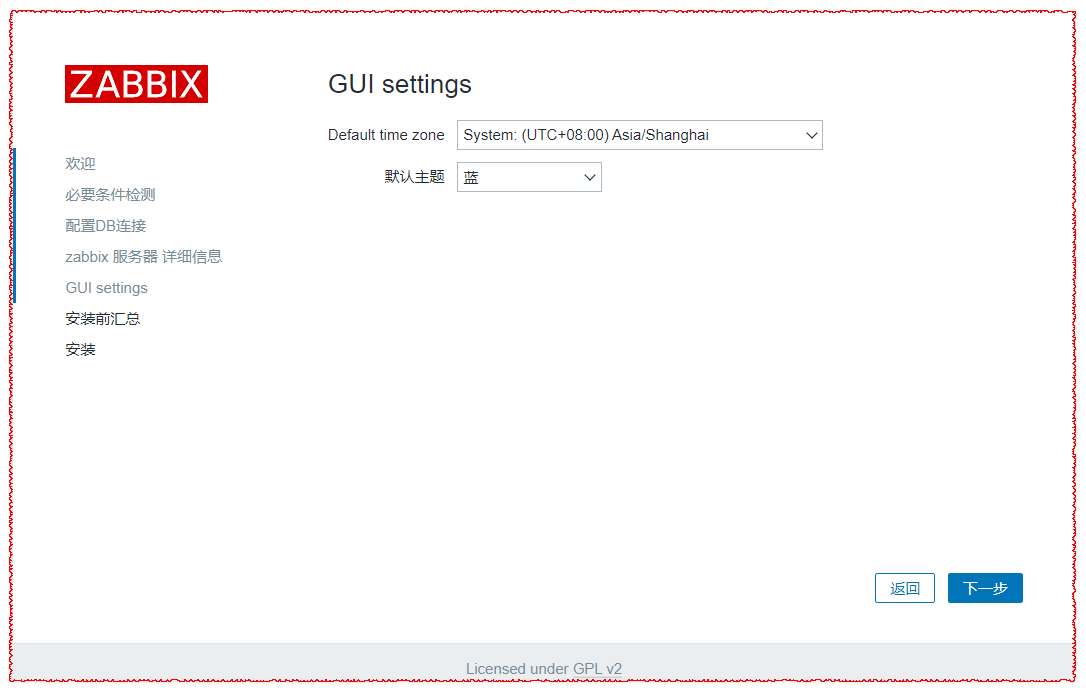
设置前端默认时区和主题:
最后两项直接通过就行
登录:
用户名:Admin
密码:zabbix
5. 配置中文界面 5.1. 手动安装中文语言包 1 dnf install langpacks-zh_CN.noarch
安装glibc-common实现对语言包的识别:
1 dnf install glibc-common
如果已安装过,需要重新安装,用reinstall
1 dnf reinstall glibc-common
检测是否安装成功:
5.2. 解决中文乱码 zabbix默认的字体文件不支持中文,所以中文字符的显示成了乱码;
在windows的C:\Windows\Fonts目录下复制想要的字体(.ttf)到服务器的/usr/share/zabbix/assets/fonts目录下,注意大写的字体名要改为小写的,
修改配置文件:
vim /usr/share/zabbix/include/defines.inc.php
1 2 3 4 5 define('ZBX_GRAPH_FONT_NAME', 'graphfont'); 修改为 define('ZBX_GRAPH_FONT_NAME', '这里写你的字体名称');
把graphfont更改为你的字体名称即可,位置在78行。
6. 安装zabbix agent agent为centos8系统
1 2 3 rpm -Uvh https://repo.zabbix.com/zabbix/5.4/rhel/8/x86_64/zabbix-release-5.4-1.el8.noarch.rpm dnf clean all dnf install -y zabbix-agent
agent为centos7系统
1 2 3 rpm -Uvh https://repo.zabbix.com/zabbix/5.4/rhel/7/x86_64/zabbix-release-5.4-1.el7.noarch.rpm yum clean all yum install -y zabbix-agent
修改配置文件
vim /etc/zabbix/zabbix_agentd.conf
1 2 3 4 5 6 7 8 9 Server=127.0.0.1 ServerActive=127.0.0.1 Hostname=Zabbix server 修改为 Server=<zbx-server的ip> ServerActive=<zbx-server的ip> Hostname=<本机的名字>
启动
1
2
systemctl restart zabbix-agent systemctl enable zabbix-agent
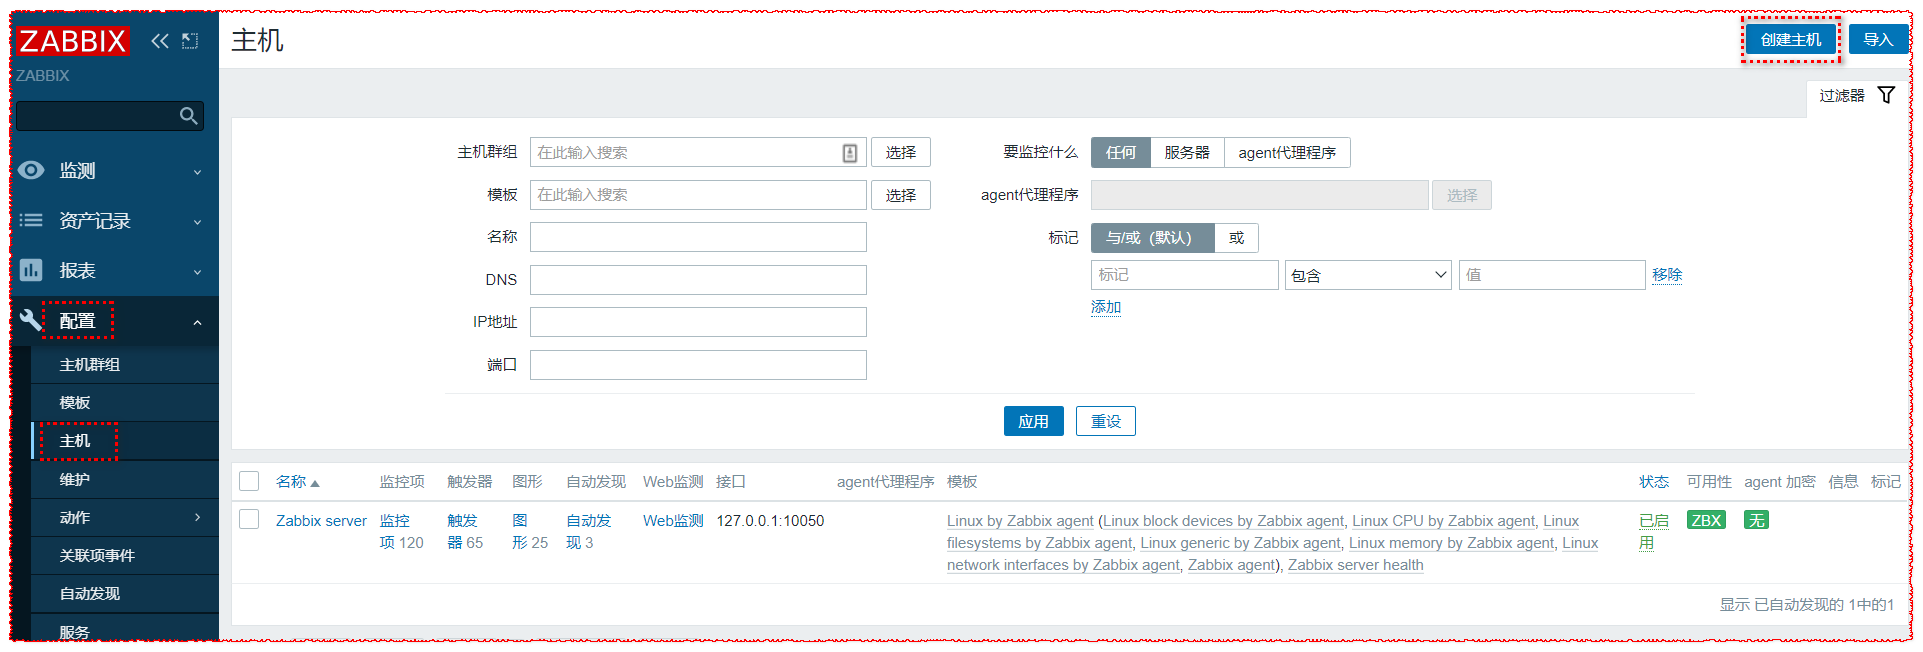
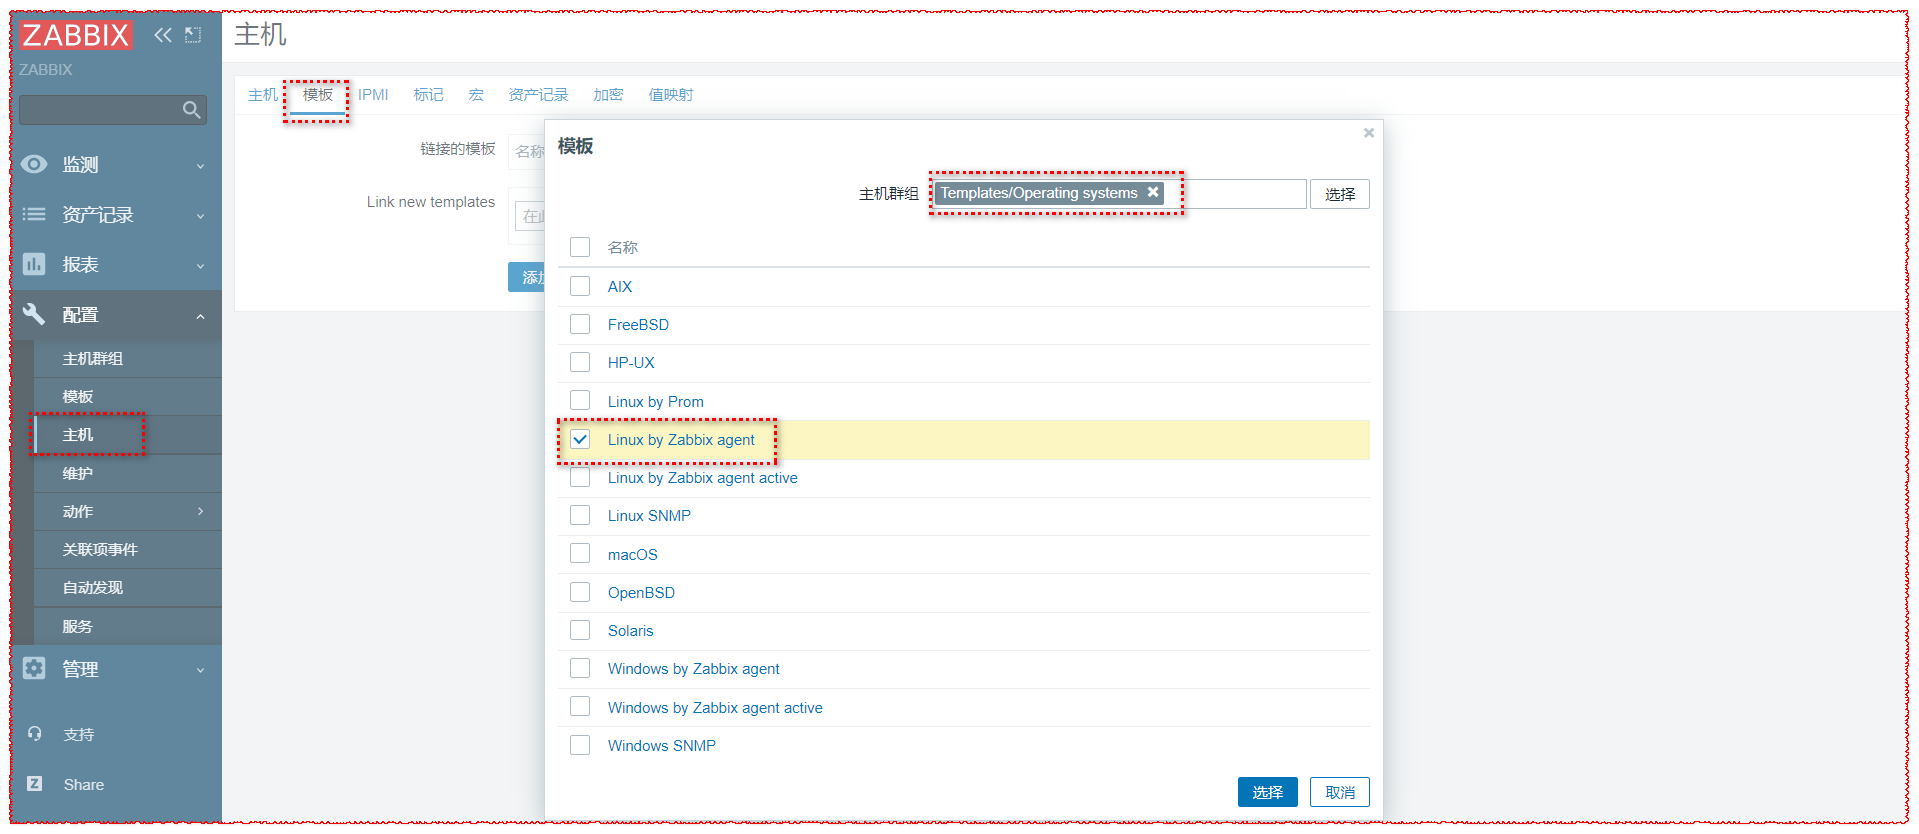
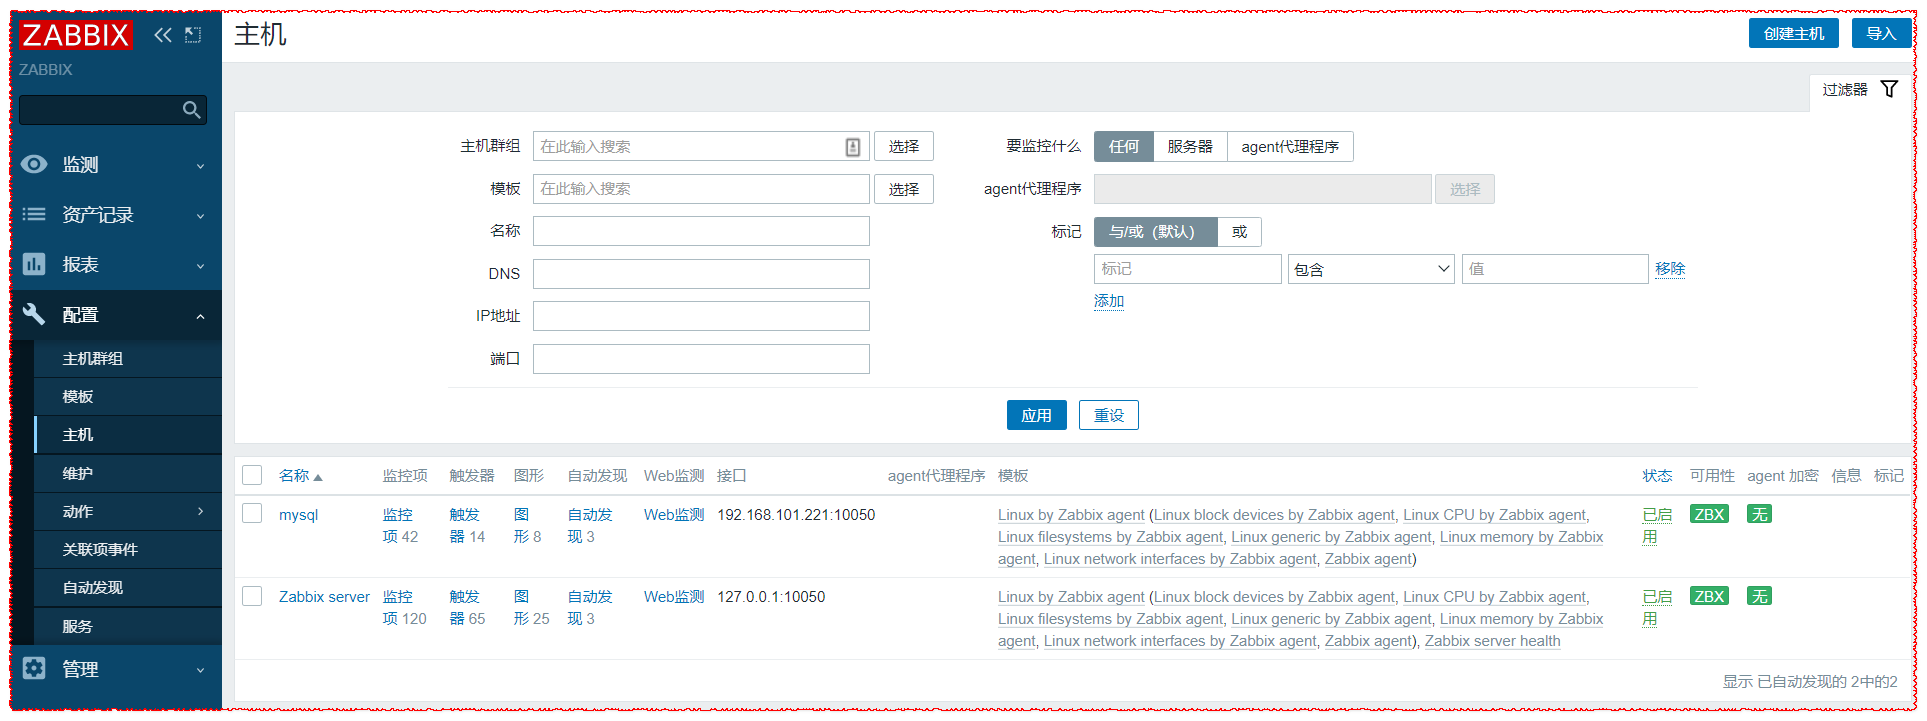
启动之后到zabbix server界面创建主机
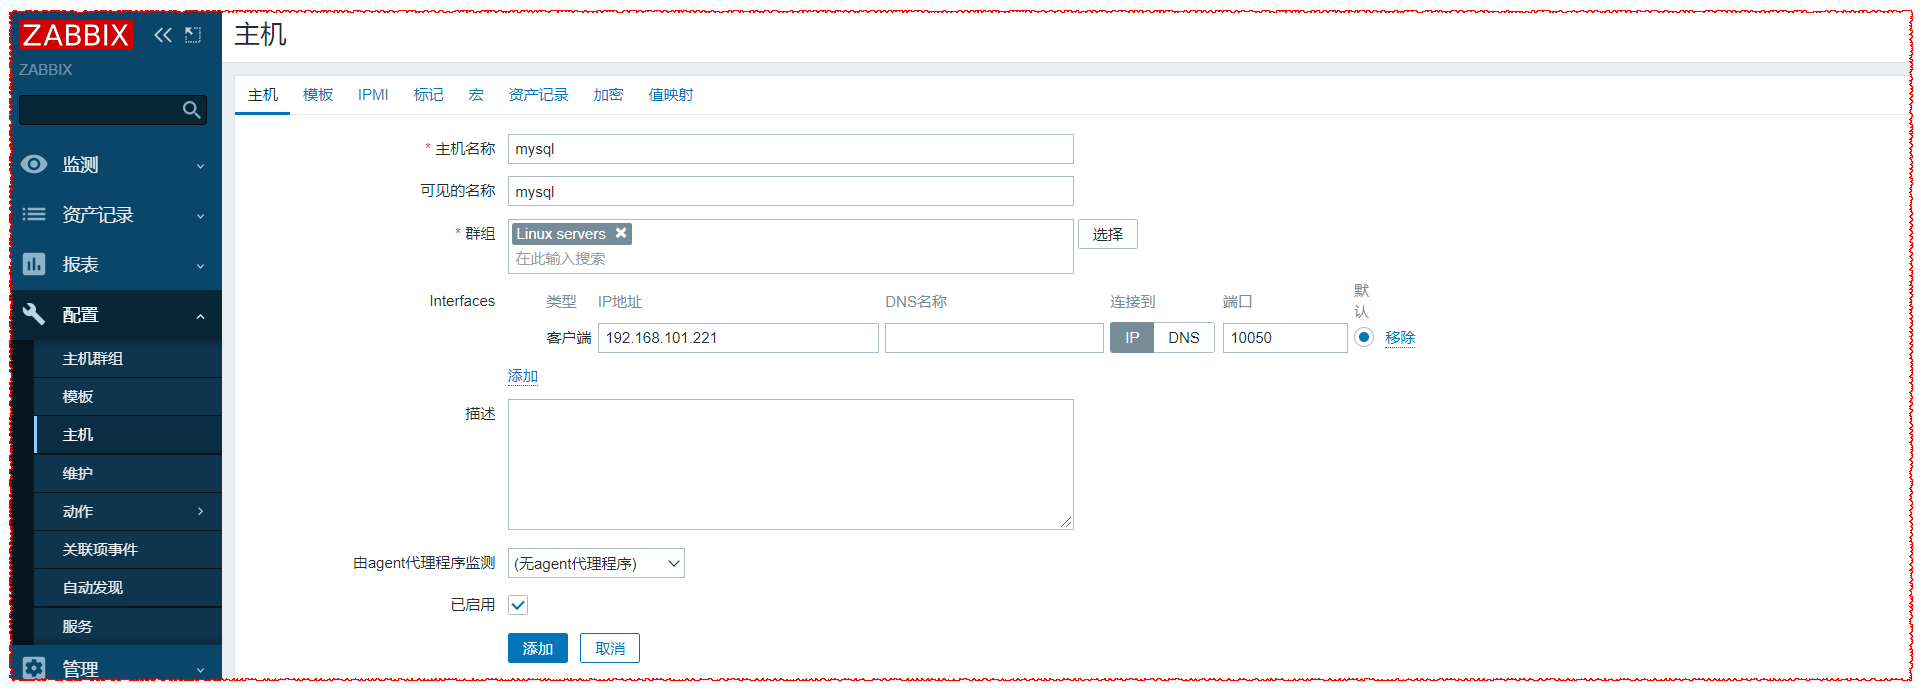
配置 - 主机 - 创建主机
填写主机信息
模板这里选择Templates/Operating systems - Linux by Zabbix agent
添加完成后过一会儿即可看到主机可用性中“ZBX”变成绿色,表示与客户端zabbix agent 连接正常,可以获取到agent数据
7. 监控MySQL8.0 前提在MySQL服务器上安装好zabbix agent
在MySQL服务器上拷贝Zabbix监控MySQL的模板文件并授权
1 2 cp /usr/share/doc/zabbix-agent-5.4.8/userparameter_mysql.conf /etc/zabbix/zabbix_agentd.d/ chown -R zabbix:zabbix /etc/zabbix/zabbix_agentd.d/userparameter_mysql.conf
模板文件内容
cat /etc/zabbix/zabbix_agentd.d/userparameter_mysql.conf
1 2 3 4 5 6 7 8 9 10 11 12 13 14 15 #template_db_mysql.conf created by Zabbix for "Template DB MySQL" and Zabbix 4.2 #For OS Linux: You need create .my.cnf in zabbix-agent home directory (/var/lib/zabbix by default) #For OS Windows: You need add PATH to mysql and mysqladmin and create my.cnf in %WINDIR%\my.cnf,C:\my.cnf,BASEDIR\my.cnf https://dev.mysql.com/doc/refman/5.7/en/option-files.html #The file must have three strings: #[client] #user=zbx_monitor #password=<password> # UserParameter=mysql.ping[*], mysqladmin -h"$1" -P"$2" ping UserParameter=mysql.get_status_variables[*], mysql -h"$1" -P"$2" -sNX -e "show global status" UserParameter=mysql.version[*], mysqladmin -s -h"$1" -P"$2" version UserParameter=mysql.db.discovery[*], mysql -h"$1" -P"$2" -sN -e "show databases" UserParameter=mysql.dbsize[*], mysql -h"$1" -P"$2" -sN -e "SELECT SUM(DATA_LENGTH + INDEX_LENGTH) FROM INFORMATION_SCHEMA.TABLES WHERE TABLE_SCHEMA='$3'" UserParameter=mysql.replication.discovery[*], mysql -h"$1" -P"$2" -sNX -e "show slave status" UserParameter=mysql.slave_status[*], mysql -h"$1" -P"$2" -sNX -e "show slave status"
由配置文件可以知道,在Linux系统中需要在zabbix-agent home目录中创建.my.cnf(默认情况下为/var/lib/zabbix),并且文件必须以下有三个字符串:
1 2 3 [client] user=zbx_monitor password=<password>
创建监控需要的用户并赋权:
1 2 3 4 5 6 7 8 9 10 11 12 mysql -uroot -p'password' # 创建监控需要的用户并赋权 create user zabbix@'%' identified by ''; grant all privileges on . to zabbixr@'%'; # 修改mysql密码加密方式为mysql_native_password alter user zabbix@'%' identified with mysql_native_password by ''; # 刷新权限 flush privileges; exit
在/var/lib/zabbix目录下创建 .my.cnf 文件
mkdir /var/lib/zabbix
vim /var/lib/zabbix/.my.cnf
1 2 3 [client] user='zabbix' password='password' #password为其密码
重启zabbix agent服务
1 systemctl restart zabbix-agent
在zabbix的web界面中添加 Template DB MySQL.